Drawing chamfers
You can construct a chamfer between two nonparallel lines by trimming the angle between them (or their projections) with a straight line that is opposite to the angle in the formed .
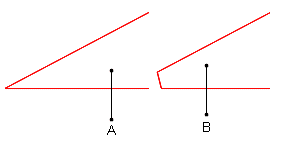
A. Two intersecting lines B. A chamfer is constructed at the point of intersection of the two lines.
The contextual edit bars
In the process of drawing and when selected.

Relative Dx and Dy while repositioning the chamfer.

Attributes
- Angle. This is the angle between the chamfer line segment and Back A. Appears as Angle in the contextual edit bar and as a=... in the Data column in the tabular area.
- Back A. This is the length of the side of the which is a projection of the first line that you clicked to define the chamfer.
- Back B. This is the length of the side of the which is a projection of the second line that you clicked to define the chamfer.
- Length. This is the length of the chamfer line segment. Appears in the Length column in the tabular area.
- Relative Dx and Dy. Appear in the contextual edit bar only while you are repositioning a chamfer by dragging. Dx and Dy are the relative horizontal/vertical offset distances between the original and the repositioned chamfer locations as projected on the respective coordinate axis. The Dx/Dy values are, respectively, the Ox/Oy coordinate position of the repositioned chamfer less the proportional Ox/Oy coordinate position of the original chamfer.
- Style. Learn more about styles.
- Id. A system-generated, unique object identification number. Appears in the Id column in the tabular area.
Control points
A chamfer has three control points: the starting and end points of the chamfer line and the vertex of the angle where the two lines that define the chamfer intersect.

NOTE: In the graphical area, to see the Back A and Back B of the chamfer, rest the pointer over the chamfer line.
Tabular presentation
When you have finished drawing a chamfer, its object type, Id number, length, the angle between Back A and the chamfer, and the style of the chamfer are recorded in the Objects tab in the tabular area.

The data in the Layers & Objects tab is unavailable for direct editing.
To draw a chamfer
NOTES: (1) You can construct a chamfer only between straight-line segments. (2) You cannot construct a chamfer between parallel lines.
- Do any of the following:
- On the , click Chamfer
 .
.
- On the Objects menu, point to Features, and then click Chamfer.
- Press CTRL+D+C+H.
- On the contextual edit bar, click Smart Fillet
 .
.
NOTE: You can skip this step and still construct a chamfer between the two objects. However, the line that you'll have drawn will be treated as a simple line, not as a chamfer. (Note the indication in the tabular area.)
- Consider the following cases:
- To construct a chamfer between two objects, click consecutively the objects.
- To construct a chamfer between two intersecting lines, click the vertex that they form.
A sample image of the fillet appears, following the motion of the mouse. Non-intersecting lines are automatically extended until they intersect; then a chamfer is constructed between them.
- In the contextual edit bar, in Angle, Back A and/or Back B enter values, press ENTER, and then click to draw the chamfer.
Notes
- If you are constructing a chamfer between two intersecting lines, you can define the chamfer by dragging the vertex to where you want the chamfer to be.
- When you remove an object that defines a chamfer, the chamfer is converted into a regular line. Also is the symbol next to its name in the table.
To modify a chamfer by changing its attributes
- Select the chamfer.
- In the contextual edit bar, in Angle, Back A and/or Back B enter values, and then press ENTER.
To reposition a chamfer by dragging
- Select the chamfer.
- Do any of the following:
- Drag the chamfer in one of the two possible directions.
- In the contextual edit bar, in Dx and Dy, enter offset distances relative to the original location of the chamfer.
- Click to position the chamfer.
To delete a chamfer
- Select the chamfer.
- Press CTRL+DELETE.
The program has deleted the chamfer and redrawn the original objects.