 For help on snapping, see Snapping objects.
You can construct a horizontal/vertical (HV) rectangle by defining its diagonal. Once a rectangle has been constructed, EngView treats its four lines as discrete objects.
During drawing:

For help on snapping, see Snapping objects.
 Starts the Detect Relations Manager.
The contextual edit bar may appear differently depending on the relations options you have set.
NOTE: For details about the attributes of regular lines, see Drawing lines and axes.
A HV rectangle has four constructional lines, each with its own control points and attributes. While you are drawing a HV rectangle, the following cursors pointers appear:
 About to define the first point of the rectangle's diagonal.
 About to define the second point of the rectangle's diagonal.
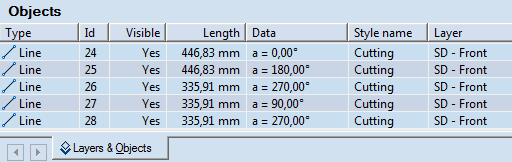
When you have finished drawing a HV rectangle, the object types, Ids, lengths, angles against the x-axis and styles of each side of the rectangle are recorded separately as regular lines in the Objects tab in the tabular area.
NOTE: For details about drawing, modifying and repositioning of regular lines, see Drawing lines and axes.
To draw an HV rectangle
 .
.IMPORTANT: If you click a line segment to place the first point, the rectangle extension mode launches. To draw an HV rectangle, hold down SHIFT and click the segment to place the first point of the HV rectangle.
To reposition a rectangle by dragging
NOTE: If you select one line of the rectangle and drag it, EngView will reposition the line, and the rectangle will be transformed into a quadrangle.