
On a dieboard, bridges are the objects that hold the rules fixed firmly onto the board and prevent the dieboard from disintegrating after the dieboard has been cut. Bridges can be edited, moved across a rule or deleted from it.
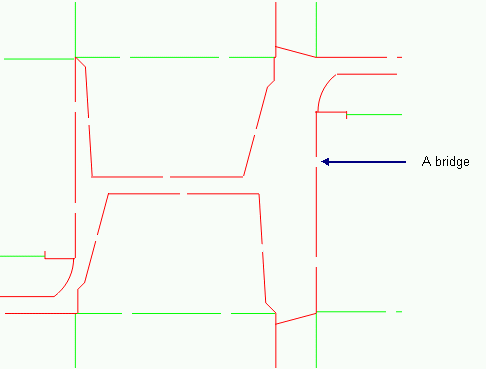
In a drawing, bridges appear as holes. These are discrete objects with properties of their own.
In a bridges drawing, the following buttons are available for editing on the Diemaking tab.
 New Bridges Drawing
 Show/Hide Closed
Regions (Available in a bridges drawing.) Displays, by hatching, if
there are any closed contours.
Show/Hide Closed
Regions (Available in a bridges drawing.) Displays, by hatching, if
there are any closed contours.
 Place bridges
(Available in a Bridges drawing) Opens a dialog box in which the automatic
bridge-placement settings are made.
Place bridges
(Available in a Bridges drawing) Opens a dialog box in which the automatic
bridge-placement settings are made.
 Place Bridges
Manually (Available in a bridges drawing.) Launches the mode in which
you can place bridges with the mouse: clicking where you want a bridge
placed.
Place Bridges
Manually (Available in a bridges drawing.) Launches the mode in which
you can place bridges with the mouse: clicking where you want a bridge
placed.
 Replace Gaps
Opens a dialog box in which the conditions
for the replacement of gaps are set.
Replace Gaps
Opens a dialog box in which the conditions
for the replacement of gaps are set.
 Manual Replace
Gaps (Available in a bridges drawing) Launches the mode in which gaps
in a bridges drawing are replaced
manually.
Manual Replace
Gaps (Available in a bridges drawing) Launches the mode in which gaps
in a bridges drawing are replaced
manually.
 Place Nicks
Launches the mode for positioning
nicks.
Place Nicks
Launches the mode for positioning
nicks.
 Place Multiple
Nicks Launches the mode for positioning nicks.
Place Multiple
Nicks Launches the mode for positioning nicks.
 New Rules Drawing
 Select Bridges
(Available in bridges drawings) Launches a variant of the select mode
in which you can select the bridges.
Select Bridges
(Available in bridges drawings) Launches a variant of the select mode
in which you can select the bridges.
NOTE: In this mode you cannot select any other objects in the drawing.
Bridges are managed in a separate drawing, which
is inherited from the layout drawing. If changes are made to the original
1up design or to the layout drawing, these changes are reflected also
in the Bridges drawing by refreshing the view. (Clicking Refresh Drawing
 .) Learn
more about how to create bridges drawings.
.) Learn
more about how to create bridges drawings.
NOTE: In a project, there can be only one bridges drawing.
Bridges' properties can be viewed in Package Designer's tabular area.
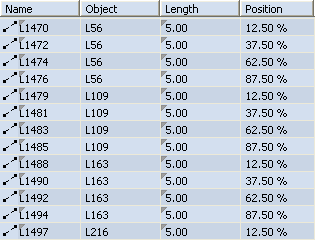
In the tabular area, a bridge is identified by its name (Name), the object on whichit is placed (Object), its length (Length) and, in percentage, its position (Position).
You can edit the properties of a bridge EngView its name, length and position. This can take place in both the graphical and the tabular areas. You can alter a bridge's position along the rule it is placed on by using the mouse and move the bridge along. NOTE: This lets you change only the position of the bridge, not its length.
To edit bridge properties
The Bridge Properties dialog box appears.

Object Displays reference information about the object on which the bridge is placed.
Name The object's system ID.
Type The type of the object — a segment, an arc or a circle.
Length The object's length.
Name Defines the bridge's ID.
Length Sets the length of the bridge.
Position In percentage, sets the location of the bridge along the object.
To Beg Sets the distance between the bridge and the object's starting point.
To End Sets the distance between the bridge and the object's endpoint.