 .
.You can place bridges manually on specific objects and according to rules that you specify.
To place bridges manually
.NOTE: Nothing takes place on the screen that you can see.
The Place Bridges Rule dialog box appears.
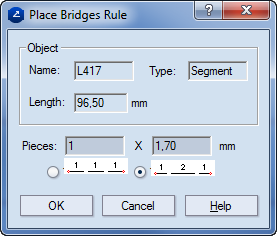
Object Reference data about the selected object.
Name Displays the object's system ID.
Type Displays the type of the selected object.
Length Displays the length of the object.
Pieces Sets how many bridges will be placed on the object, as well as how long they will be. NOTE: The division of the object into intervals begins at the object's center.
 Places the bridges at equal intervals along the
object.
Places the bridges at equal intervals along the
object.
 Places the bridges at equal distances along the
object and at half-length at the ends.
Places the bridges at equal distances along the
object and at half-length at the ends.
NOTE: To place bridges also on all identical objects in
the dieboard, before you click OK, click Repeat Changes
 .
.
If your layout has rotated parts and you want to place its bridges manually, often you might want to place different types and numbers of bridges to the rotated and the nonrotated parts. This may involve long and arduous work on the bridges drawing that might result in missing some parts, some bridges, or both.
You can spare yourself the hassle by defining, in the layout, how you want the Repeat Changes functionality to apply to rotated parts. Then, while you are placing bridges manually in the bridges drawing, the Repeat Changes functionality takes care of populating the bridges to the parts with identical rotation.
In the layout drawing, you define groups of layout parts rotated at a specific angle. After you've defined a group, you proceed with creating a bridges drawing. Then, while you are manually placing the bridges, the Repeat Changes functionality — it is turned on by default — places the bridges only to the parts in the predefined group. Apart from saving time, this technique guarantees that the bridges you are placing are where you want them and nowhere else.
To define a group of equally rotated parts

The group applies:
With same angle. To all parts rotated at the same angle as the selected part.
With +/- 180. To parts rotated at plus or minus 180 degrees with regard to the selected part. IMPORTANT: This means that the selected part will not be part of the group.
With +/- 90. To parts rotated at plus or minus 90 degrees with regard to the selected part. IMPORTANT: This means that the selected part will not be part of the group.
With any angle. To all rotated parts.
The Repeat Changes group has thus been set up.
Create a bridges drawing.
Start placing bridges manually.
Now, each time you start manually placing bridges and use the Repeat Changes functionality, the bridges you set will be placed on every part in the group. This is the default mode that will apply each time you do this operation.
NOTE: If you want to use a different mode of manual bridge placement but do not want to lose the default group, you can do a one-off override for the current work session. Repeat the above procedure but in Step 3 point to Repeat Changes Group, and select an option in the context menu. Then proceed with creating the bridges drawing and the manual placement of bridges. The Repeat Changes functionality applies the bridges in line with the group you set up in Step 3. Note that when you exit EngView, this temporary grouping will be lost and the next time you star the program, the default group will apply.