Manual placement of layout 1ups
NOTE: You can place layout 1ups (parts)
into a layout either from the and from
the tabular area (in the Part Statistics tab). Since the two methods
share some of actions, the procedure that follows indicates the alternatives.
To insert parts manually
- Do any of the following:
- On the , click
the New Layout Drawing
 .
.
- On the Layout menu, click New Layout Drawing.
- Press CTRL+L+N.
The Select Layout dialog box appears.
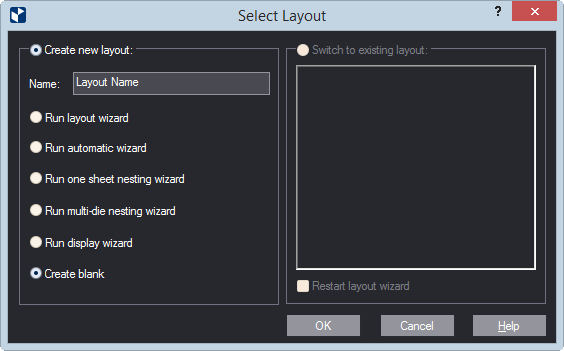
- Click Create blank, and then click OK.
A blank layout drawing opens.
COMMENTARY: In the tabular area, in the Part Statistics
tab you can see a list of all the designs in the project and also all
the articles prepared for each design. For example, if the project consists
of one design for which five articles have been prepared, in the Part
Statistics tab you will see six designs: one for the original design and
also the design's five article versions. For the layout you proceed by
selecting the design you
need.
- To add sheet, do any of the following:
- On the , click
Sheet
 .
.
- On the Layout menu, click Sheet.
- Press CTRL+L+S.
The Object Properties dialog box appears.
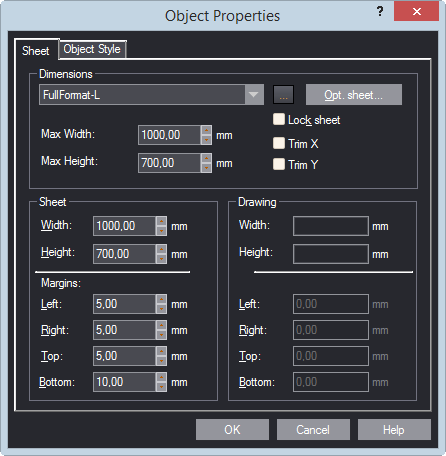
- To adjust your sheet, do one of the following:
- In Sheet, select an available sheet from the list, or browse
to add a sheet from the sheet database.
- In Width and Height, enter your own sheet dimensions.
- In the Margins area, enter the sheet's margins.
- (Optional) In the Dimensions area, select the Lock sheet
check box to disable the sheet's automatic centering around layout
1ups.
- To begin placing layout 1ups (parts), do any of the following
- In the tabular area, in the Part Statistics tab, select
the design or article that you want.
- On the , click
Place Part
 .
.
- On the Layout menu, click Place Part.
- Press CTRL+L+P+P.
As you begin placing the design, a contextual edit
bar appears above the graphical area.

- In Part, choose a 1up to insert in the layout.
- In Article, select the article for the 1up. NOTE: The list
contains all the articles for the existing layout 1ups (parts). For
example, if there are five articles for a layout 1up (part), all five
are listed and you can select the one you need for the layout.
- (Optional) If your layout will turn out better if the part is flipped
(vertically mirrored), select the part, and then click Flip Layout
Part
 .
.
- (Optional) Click Proportional Scale
 to turn it on, and then in Scale X and Scale Y enter
scaling quotients.
to turn it on, and then in Scale X and Scale Y enter
scaling quotients.
- (Optional) In Angle, set a rotation angle for the 1up that
you are inserting.
- (Optional) Snap
the control point of the part to another object or point.
- (Optional) To use automatic detection of parts' edges, click Detect
Edge Collisions
 . NOTE: See how
to use this functionality and how you can benefit from it in the
creation of a layout.
. NOTE: See how
to use this functionality and how you can benefit from it in the
creation of a layout.
- In the sheet, click where you want the part to be.
- Repeat Steps 8–15 for all the layout 1ups that you want.
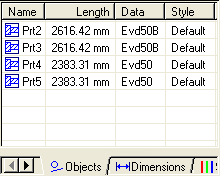
Note: When you insert a layout 1up, its name, the length
of its constituent objects, the name of its 1up, and its style are recorded
in the Objects tab in
the tabular area. To change the name of any part,
enter it in the Name column.