 .
. .
.In an imported die drawing, if you need to replace the gaps with actual bridges, you can do so:
..The Replace Gaps dialog box appears.
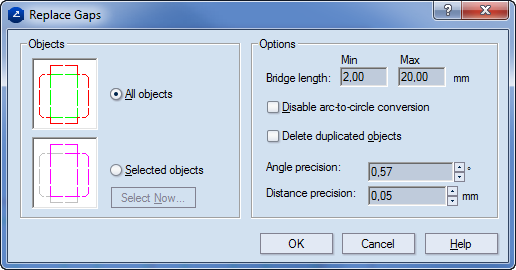
Objects By these options, the areas are defined in which bridges will be replaced.
All objects The replacement of gaps will be applied to all the objects in the drawing.
Selected objects The replacement of gaps will be applied to selected objects. These can be selected in advance, in the drawing or in the dialog box (when you click Select Now, and then define filtering criteria).
Options Оptions for the replacement of gaps
Bridge length Defines, as an interval, how long a gap must be to be replaced by a bridge. Gaps which fall outside the length interval will not be replaced and will remain gaps.
Disable arc-to-circle conversion When the check box is empty, the arcs which were originally parts of circles will be restored as circles.
Delete duplicated objects Merges overlapping objects.
Angle precision When a gap links two nearly parallel objects, the program treats them as parallel to produce a straight line after the gap is removed. Here, the angle value is entered within which two nonparallel objects linked by a gap may fall so as to be treated as parallel and the gaps between them can be replaced with bridges.
Distance precision When a gap links two nearly collinear objects, the program treats them as collinear to produce a straight line after the gap is removed. Here, the distance value is entered within which two noncollinear objects linked by a gap may fall so as to be treated as collinear and the gaps between them can be replaced with bridges.
In the imported drawing, the program restores the original objects and replaces the gaps with bridges in the bridges drawing.
IMPORTANT: If you want to replace gaps in arcs, automatic gap replacement works only for gaps whose length equals or is shorter than 1/4 of the length of the entire arc.
Manual replacement of gaps is needed in individual cases for which the automatic gap replacement is unusable.
. .
.Nothing takes place that you can see on the screen.