You can make snapshots of particular states of a design's folding sequence and use them to document the stages the design goes through during its construction. The most common use of snapshots is in print presentations, where they demonstrate what the final product looks like in various stages of the production process.
In this section you will learn how to:
In the graphical area of the 3D drawing, right-click anywhere, and then click Make a Snapshot on the context menu.
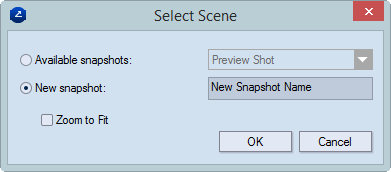
The Select Scene dialog box appears.
Consider the following situations:
To save the snapshot with a new name, in the Select Scene dialog box, click the New snapshot option, and then type a name for the snapshot.
To replace an existing snapshot, click Available snapshots, and then in the drop-down list choose an earlier shot to override.
IMPORTANT: Preview snapshot are always named Preview Shot and each new one replaces the earlier. This makes it referable in automated workflows.
In the graphical area of the 3D drawing, right-click anywhere, and then click Make Preview Snapshot on the context menu.
Nothing takes place that you can see on the screen. To see the snapshot, change the position of the 3D model in the work area, right-click an empty space, point to Snapshots, and then click Preview Shot.
If, after making a snapshot, you have changed the position of the 3D model and need to revert to its snapshot position, do any of the following:
In the 3D work area, right-click, point to Snapshot on the context menu, and then click Preview Shot.
On the Tools menu, click 3D Presenter, and then click Activate Preview Snapshot on the context menu.
The position of 3D model changes to what it was in when the snapshot was taken.