
In Illustrator, the integration with EngView is manageable by means of five panels — EngView Parameters, EngView Proceses, EngView Articles, EngView Step & Repeat, and EngView 3D. To view these panels, in Illustrator, on the Window menu, point to and then click the panel window that you need.
==========================
Image scaling and exporting tools
==========================
The panel lists all the artworks in the project. This is where you create, delete artwork-holding artboards.
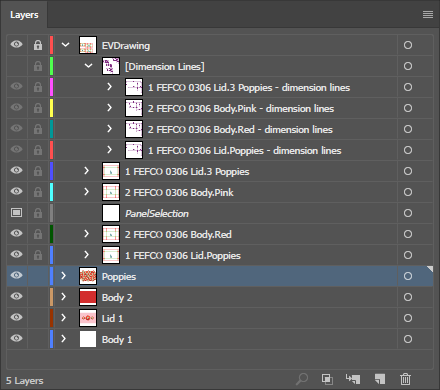
An EngView drawing is displayed as a layer in the Layers panel. The project is shown in one main layer with sublayers — one for each the dimensions and for each of the drawings (1ups) in the project.
Each drawing has its own artboard in Illustrator's work area. In the Layers panel, the number that's in front of the drawing's name corresponds to the number of the artboard.
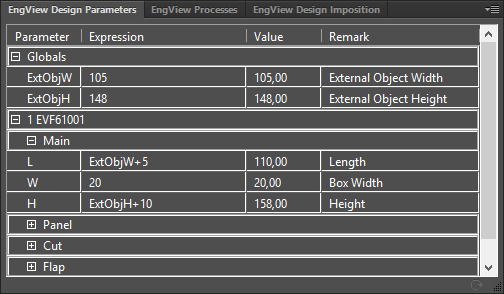
The EngView Parameters panel displays the parameters — global and local — in a project. In multiple-drawing projects, the local parameters (the parameters in each drawing) are displayed in separate, collapsible rows, whose names are identical with that of the drawings. In the collapsible rows, the local parameters are further subdivided into rows that correspond to the parameter groups to which the parameters are assigned.
In the panel's bottom
is recalculation button  .
When you have made changes to a parameter expression and click the button,
the drawing is recalculated and the 3D model is refreshed.
.
When you have made changes to a parameter expression and click the button,
the drawing is recalculated and the 3D model is refreshed.
In its upper right corner,
each integration-related panel has the Edit in
Package Designer button  .
Clicking the button opens the project in EngView.
.
Clicking the button opens the project in EngView.
The EngView Processes panel displays the elements in the project that carry finishing effects. These can be based on an EngView drawing, an Illustrator layer, or a spot color.

Colors/Layers/EV Drawings Displays the layer name — colors, AI layers, or EngView drawings.
Process Displays the name of the process. Context-relevant selection of processes is allowed, depending on the layer selected in the Colors/Layers/EV Drawings column.
Type Displays the process type. Context-relevant selection of processes is allowed, depending on the layer selected in the Process column.
[Color Field] (Available for the processes Partial Foil Stamping and Monochrome Print) Displays the color currently applied to items in the selected layer. NOTE: For the Partial Foil Stamping process, Colored foil must be selected in the Value column.
 New process Creates a new process. It
appears as a record in the list.
New process Creates a new process. It
appears as a record in the list.
 Remove Deletes a selected process.
 Move
up Moves a selected layer up the list.
Move
up Moves a selected layer up the list.
 Move
down Moves a selected layer down the list.
Move
down Moves a selected layer down the list.
The EngView Articles panel displays the articles created in the project and is the place where articles are created and where artworks are assigned to articles.
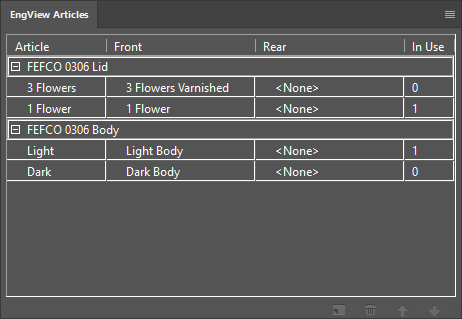
Article |
The name of the article. |
|
Front |
The name of the artwork for the front side of the structure. |
|
Rear |
The name of the artwork for the rear side of the structure. |
|
In Use |
Indicates how many times the part on which the article is applied is used in project. For example, if you are working with a display that has six shelves, the In Use column will display 6. |
|
Add New Article |
Click this button to add a new article to the list. Then proceed with assigning artworks for its front and rear. |
|
Remove Article |
Click this button to delete an article. Deleting an article does not delete the artworks assigned to it. |
|
The 3D panel displays a 3D model of the project as defined in EngView. In Illustrator, you can load articles to the structure, navigate around a 3D model, set its appearance, set material for the design, and export the 3D representation to a different file format.
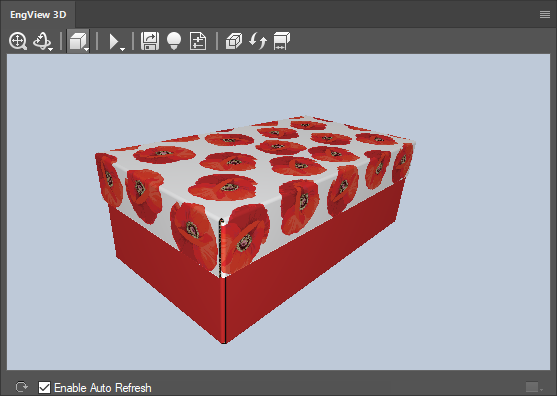
Enable Auto Refresh
When the check box is selected, changes in the canvas area are immediately
reflected in the 3D view. NOTE: When the graphical design is too large,
this functionality slows down the work of the 3D window. For smoother
work, it is better to leave the check box empty and refresh the 3D view
by clicking the Refresh button .
Refresh
Updates the 3D view according to changes in the canvas area.

 Fit Makes the 3D model fit the current
size of the preview area.
Fit Makes the 3D model fit the current
size of the preview area.
 Zoom (dropdown function) Launches the
zooming mode for the preview area.
Zoom (dropdown function) Launches the
zooming mode for the preview area.
 Turn (appears on dropdown list) Launches
the turn mode, in which you can rotate the 3D model.
Turn (appears on dropdown list) Launches
the turn mode, in which you can rotate the 3D model.
![]() Pan (dropdown function) Launches the pan
mode, in which you can move the 3D model horizontally across the preview
area.
Pan (dropdown function) Launches the pan
mode, in which you can move the 3D model horizontally across the preview
area.
 Wireframe (dropdown function) Presents
the design by only showing the edges and not the panels.
Wireframe (dropdown function) Presents
the design by only showing the edges and not the panels.
![]() Transparent (dropdown function) Presents
the panels of the 3D model as transparent.
Transparent (dropdown function) Presents
the panels of the 3D model as transparent.
 Solid (dropdown function) Presents the
panels of the 3D model as nontransparent.
Solid (dropdown function) Presents the
panels of the 3D model as nontransparent.
 Phase navigation. Opens a bar with navigation
buttons for playing back a folding sequence of the 3D model.
Phase navigation. Opens a bar with navigation
buttons for playing back a folding sequence of the 3D model.
 Export 3D Opens a dialog box in which
you can set the options for exporting a 3D model file.
Export 3D Opens a dialog box in which
you can set the options for exporting a 3D model file.
 Scene settings Opens a dialog box in which
you can set the visual properties of the 3D scene.
Scene settings Opens a dialog box in which
you can set the visual properties of the 3D scene.
 Drawing material properties Opens a dialog
box in which you can manage the properties of the material selected for
the design.
Drawing material properties Opens a dialog
box in which you can manage the properties of the material selected for
the design.
 Make Replication Spreads an image across
different planes.
Make Replication Spreads an image across
different planes.
 Update Replication Refreshes the spreading
of an image across different planes when its position was changed.
Update Replication Refreshes the spreading
of an image across different planes when its position was changed.
 Show Dimensions Shows measurement lines
of the 3D model if these are available in the project.
Show Dimensions Shows measurement lines
of the 3D model if these are available in the project.
In the upper right angle of the panel, a context menu appears:
 Select Article. In the 3D model, switches to the
respective article.
Select Article. In the 3D model, switches to the
respective article.
In the panel you proceed to generating print-ready files from the layout drawing you create in EngView.
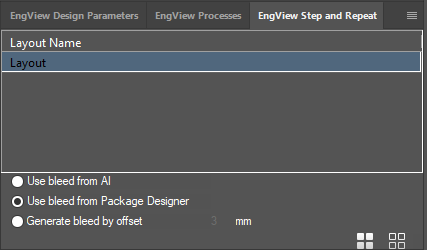
Layout Name A list of the layout drawings as generated in EngView.
Use bleed from AI Select this option if you will create the bleed using the Illustrator functionality.
Use bleed from Package Designer Select this option if you will use the bleed you created in EngView.
Generate bleed by offset Enter an offset value that will set the bleed area.
 Generate
Front Layout When you click the button, Illustrator creates a new
.ai file in which the layout 1ups on the front side are matched with their
corresponding artworks.
Generate
Front Layout When you click the button, Illustrator creates a new
.ai file in which the layout 1ups on the front side are matched with their
corresponding artworks.
 Generate
Rear Layout When you click the button, Illustrator creates a new
.ai file in which the layout 1ups on the rear side are matched with their
corresponding artworks.
Generate
Rear Layout When you click the button, Illustrator creates a new
.ai file in which the layout 1ups on the rear side are matched with their
corresponding artworks.
The exporting and scaling tools are positioned on the Tools panel.
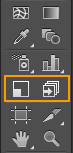
The two tools work as follows:
 EngView Scale Tool
Scales an image that is
about to be applied to an artboard to fit the pre-scaled-down artboard
drawings. The situation arises when you are working on a structure whose
artboards have been scaled down to fit the canvas size of Illustrator
and you then begin applying an image to any of them. To use the tool,
select the image, and click the button. Illustrator detects the scaling
ratio of the artboards and scales the image down accordingly.
EngView Scale Tool
Scales an image that is
about to be applied to an artboard to fit the pre-scaled-down artboard
drawings. The situation arises when you are working on a structure whose
artboards have been scaled down to fit the canvas size of Illustrator
and you then begin applying an image to any of them. To use the tool,
select the image, and click the button. Illustrator detects the scaling
ratio of the artboards and scales the image down accordingly.
 EngView Export Tools
Clicking this button offers three functionalities:
EngView Export Tools
Clicking this button offers three functionalities:
 Open artboard as separate document
The program opens the artboard selected in the canvas in a separate
file without scaling.
Open artboard as separate document
The program opens the artboard selected in the canvas in a separate
file without scaling.
 Export all artboards as PDFs The program
exports all artboards
in the canvas as PDFs to a directory of your choice.
Export all artboards as PDFs The program
exports all artboards
in the canvas as PDFs to a directory of your choice.
 Export selected artboard as PDF The
program exports the artboard selected in the canvas as a separate
PDF file.
Export selected artboard as PDF The
program exports the artboard selected in the canvas as a separate
PDF file.
NOTE: Artboards are exported with all the artwork applied to them and without scaling.