Formatting drafting colors
Drafting colors are:
The colors of the background
of the graphical area, the colors of an object when you drag, select,
highlight, activate it, as well as the colors of the coordinate axes.
The colors of the styles
applied to objects.
Custom color sets
You can set your own color sets of how you want
objects and actions to appear on the screen. For example, the default
system colors may not appear in any workable manner on a dark background;
the same applies to light colored styles on light backgrounds.
The program stores the drafting color sets you
define in the DraftColorPresets.ini file in your installation's Settings
folder.
Do not use backgrounds
IMPORTANT:
To see the effect of an applied custom color set, make sure the Use Backgrounds
functionality is turned off. To turn it off, on the Format
menu, point to Materials Catalog, and
then uncheck Use Backgrounds. This way
the program will not take into account the background
settings for the materials, and will use the color set in Colors.
Drafting colors are onscreen only
Color sets apply to what you see on the screen:
when exported, drawings will appear in the globally
set colors and in accordance to printing
and exporting rules.
=============
Defining and applying a color
set
Applying an existing color set
=============
To define and apply a color
set
- On the Format menu, click Colors.
The Drafting Colors
dialog box appears.
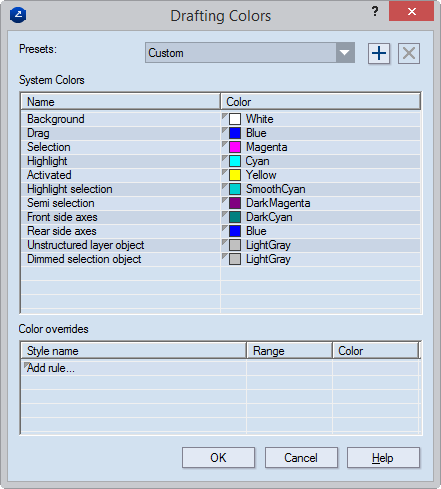
- In the System
Colors section, in the Color
column rows, click the row of an action (in the Name
column), and then, in the dropdown list, select a color for how you
want the program to display the action on the screen.
- Background
The background of the graphical area in 1up, layout and print
drawings. Applies to both sides the drawing (front and rear).
The default color is white. IMPORTANT:
To view the background in a color that you set here, on the Format menu, point to Materials
Catalog, and then ensure that Use
Backgrounds is not checked.
- Drag The color
of the sample image of objects being dragged across the graphical
area.
- Selection
The color of selected objects
- Highlight
The color of objects acquire when you point to them
- Activated
The first object you select while aligning a layout 1up and print
parts.
- Highlight selection
The color in which a selected object appears when you point to
it.
- Semi selection
Applies when the Repeat Changes functionality is turned on (layout
and CAM drawings). When you select a part in the drawing, all
nonselected identical parts appear in the color set here.
- Front side axes
The color of the coordinate system axes when viewed from the front
side. TIP: You can set different colors for the axes when viewed
from the front and rear sides. This will then serve as a hint
as to which side you are working on.
- Rear side axes
The color of the coordinate axes when viewed from the rear side.
TIP: You can set different colors for the axes when viewed from
the front and rear sides. This will then serve as a hint as to
which side you are working on.
- Unstructured layer
object During unstructured
layout recovery, the original position of a layout part.
- Dimmed selection
object The color an object subjected to the transformations
translation,
scaling, rotation
or mirroring when
the Copy functionality is not turned on. During the transformation,
the original object has the color set here and remains visible
while its new position is being sought.
- In the Color
overrides section, add rules for the colors. Here you set how
the preset will override the globally
set colors for styles in onscreen visualization. NOTE: When printed
or exported, the drawing's styles (colors) will appear as set globally
and in accordance with print rules (filters).
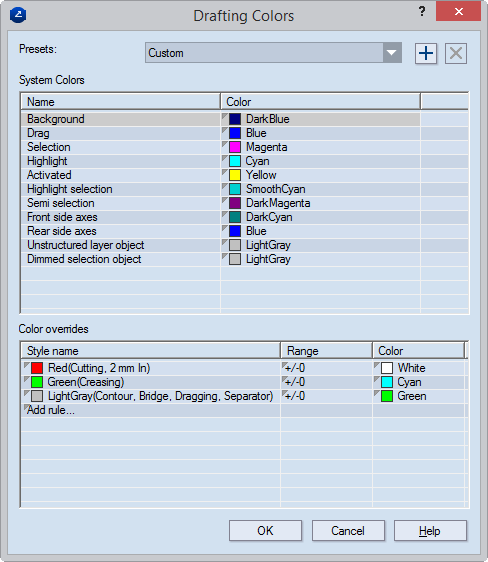
IMPORTANT: In the Color
overrides section, you substitute colors, not styles. While adding
a color-overriding rule, in the dropdown list you see the colors currently
set to styles on your system and, in brackets, the names of these
styles. By setting a color-overriding rule, all the styles to which this
color is currently assigned will appear in the color you set in the rule.
TIP: To delete a rule, select it, and then press DELETE.
- After you have set color-overriding rules,
in the dialog, click the Plus button, and in the dialog box that appears
type a name for the preset. Then click OK.
- Click OK to
close the Drafting Colors dialog box.
- To apply the color set, on the Format
menu, point to Materials Catalog,
and then make sure that Use Backgrounds
is not checked.
To apply an existing preset
- On the Format
menu, point to Materials Catalog,
and then make sure Use Backgrounds
is not checked.
- On the Format
menu, click Colors.
The Drafting Colors dialog box appears.
- In Presets,
click the list, and then select the name of the preset you want to
use.
- To apply the preset, click OK.