 .
.The automatic resolution of conflicts is a way of resolving identical conflicts across the layout by applying the same technique. You set a series of steps which Prinect then applies to all identical conflicts across the layout. Here the designer is advised to work out a method of resolving that will suit his or her case, and then apply a technique.
As a rule, choosing a conflict resolution method can vary depending on the project at hand and how the layout is arrayed. That is why any single conflict resolution approach is nothing but a suggestion. What follows is a general scenario.
IMPORTANT: Using the automatic clip path conflict resolution is not a guarantee that all conflicts will be resolved; after applying it, you may still find some unresolved conflicts.
To use automatic resolution of clip path conflicts
.The Automatic Conflict Resolution dialog box appears.
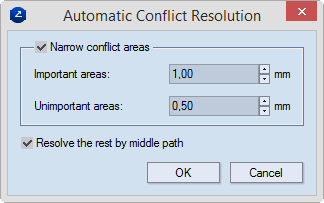
In the dialog box, you set how you want Prinect to resolve the bleed conflicts. The options work jointly or separately depending on your choice.
| Narrow Conflict Areas | Here, you enter the values by which Prinect will reduce the bleed areas. In Important areas and Unimportant areas, you type values for how much Prinect will reduce the areas. The values may differ. When you then click OK, Prinect will reduce all identical areas by the entered values. See an example of how narrowing the bleed areas resolves the overlapping conflict. |
|---|---|
| Apply win-loss resolution | Having reduced the bleed areas, Prinect then applies the Win-Loss
resolution
method to resolve the conflicts and produce the final line
along which the bleed will lie.
NOTE: The check box is selected by default when you use the Narrow Conflict Areas option, but can be used separately if the latter is not used. In that case, Prinect uses the far-near concept to make areas win or lose (see below). |
| Resolve the rest by middle path | Prinect will apply the Middle Path resolution method to resolve all the conflicts that have not been resolved with any of the above techniques. |
Prinect resolves the conflicts according to the bleed values you have set.
A message appears telling you how many clip path conflicts have been resolved.
 top
of page
top
of page
The "far" and "near" concept for resolving clip path conflicts is derived from the definition of a minimum bleed. The area within the minimum bleed is regarded as "near", the area within the bleed that is not "near" is treated as "far". The following table gives the conflict resolution rules. It answers the question "What happens if a row area conflicts with a column area?".
| No Artwork | Far From Unimportant | Far From Important | Unimportant or Near-Unimportant | Important or Near-Important | |
|---|---|---|---|---|---|
| No Artwork | Irrelevant | — | — | — | — |
| Far From Unimportant | Row Area Wins | Resolve By Hand | — | — | — |
| Far From Important | Row Area Wins | Row Area Wins | Resolve By Hand | — | — |
| Unimportant or Near-Unimportant | Row Area Wins | Row Area Wins | Row Area Wins | Resolve By Hand | — |
| Important or Near-Important | Row Area Wins | Row Area Wins | Row Area Wins | Row Area Wins | Resolve By Hand |
* The " —" marked cells are identical with the W cells.
top of page