Click the icon to watch the video. Run time: 2:06 min.
PROCEDURAL STEPS
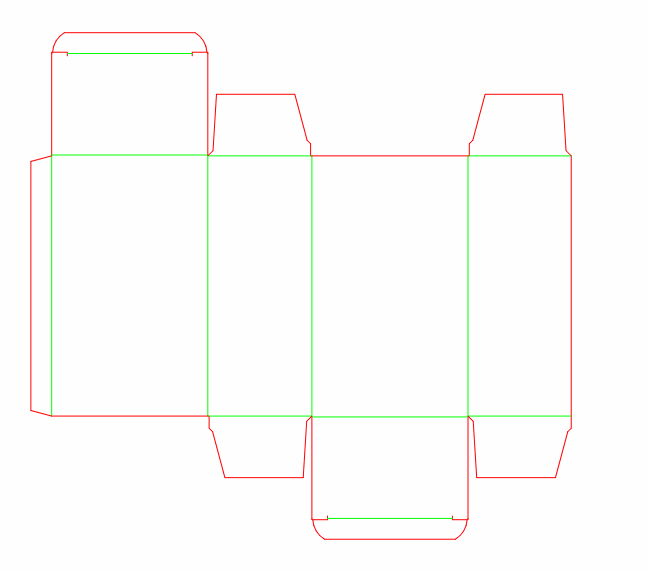
Start a new project.
Draw the four rectangles forming the box body along the coordinate axes (height 150 x width 60mm and height 150 x width 90mm) rectangle mode.
Draw the vertical line of the glue flap at a 12 mm distance from the rightmost body line — use the Quick Offset drawing mode.
Draw the lower edge of the glue flap at an angle 25 degrees regular line mode.
Make a mirror transformation to it to form the upper edge.
Trim the protruding ends of the vertical line of the glue flap.
Change the style of the inner lines to creasing.
NOTE: The Save command is available for new or imported projects.
Phase 2: Drawing the top and bottom tuck-ins
Click the icon to watch the video. Run time: 4:30 min.
PROCEDURAL STEPS
Draw the left border line of the top tuck-in (L 60.75mm, Angle 90 degrees; L 10mm, Angle 0 degrees; Angle 275 degrees, Dy –2.25mm) — regular line drawing mode.
Make a mirror representation of it to form the right border line.
Draw a line parallel to the x-axis and at 0.75 mm below the two upper horizontal lines — set the starting point of the line at 0.75 mm below the upper left line, then draw a line parallel to the x-axis — regular line drawing mode.
To ensure that the new line is not attached automatically to the upper left line but lies 0.75 mm beneath, disable detection of on-relations. While still in regular line mode, click the Detect Relations Manager button , and then on the floating toolbar ensure that the on-relation button is not pressed in.
Trim the protruding edges of the line.
Draw a line above and parallel to the previous one, at 12 mm — Quick Offset drawing mode.
Draw an arc by BCE to form the upper left corner of the tuck-in: set the starting point of the arc at 0.5 mm from the leftmost corner of the tuck-in; the starting point of the arc should lie on the short leftmost horizontal line; set a radius of 14 mm; the center point of the arc should lie somewhere on the lower connecting line; and the end point of the arc should lie on the extension of the uppermost horizontal line.
Make a mirror representation of the arc to copy it at the right corner of the tuck-in.
Extend the line between the two arcs.
Align the folding line of the tuck-in at 0.5mm (common cardboard thickness) upwards.
Changing the style of the two inner lines to creasing.
Translate the upper tuck-in to form the lower one, including horizontal mirror and copy.
Delete the redundant cutting line of the lower tuck-in.
Phase 3: Drawing the dust flaps
Click the icon to watch the video. Run time: 3:34 min.
PROCEDURAL STEPS
Draw the top side of the upper right dust flap — Quick Offset drawing mode, at 36 mm.
Draw the left side of the upper right dust flap. Set the starting point of the lines, so that you can start drawing the actual left flap side at 0.5mm to the right of the vertex, as shown in the video (L=8mm, Angle=90 degrees; Angle=45 degrees, Dx=3mm, Dy=3mm; Angle=75 degrees, Dy=25mm) — regular line mode.
Draw the right side of the flap (Angle=135 degrees, Dx= –3mm, Dy=3mm; Dx= –2mm, Dy=33mm) — regular line drawing mode.
Trim the protruding ends of the top line while holding down CTRL.
Break the folding line of the dust flap and at the same time change its style to Creasing.
Translate the dust flap to form the three remaining dust flaps. (Use copy, rotation angle 180 degrees, vertical and horizontal mirror, as shown in the video).
Break the folding lines of the translated flaps, at the same time change their style to Creasing.
Align the left-most line of the box body and the left edge of the upper left dust flap with 0.5mm to the right — Align Transformation mode.
Trim the protruding line ends.
Phase 4: Drawing the holes
Click the icon to watch the video. Run time: 2:12 min.
PROCEDURAL STEPS
Draw a circle on the upper line of the second side of the body.
Trim the upper arc of the circle and the line segment between the end points of the remaining arc.
Draw a circle by center on the lower line of the fourth side of the body (The center of the circle is placed on the line).
Align the horizontal center of the circle (The center coincides with the middle point of the line).
Trim the lower arc of the circle and the line segment between the end points of the remaining arc.
Draw an ellipse inner to the second side of the box body (primary radius 40mm, angle 270 degrees).
Align horizontal and vertical center of the ellipse (center is at equal distance from the horizontal and vertical lines of the rectangle).
Phase 5: Drawing the glue strips and the fillets to the dust flaps
Click the icon to watch the video. Run time: 2:04 min.
PROCEDURAL STEPS
Insert a hull inner to the glue flap (inner hull, by 2 mm, Normal style).
Fill the area inside the hull (angle 25 degrees, spacing 5 mm, Perforating style).
Convert the fill lines to discrete lines. TIP: Select the fill, right-click it, and then select Convert on the context menu.
Delete the hull frame and the topmost line of the ex-fill lines. TIP: Select by attributes all objects with Normal style and delete them, then manually delete the short topmost line of the ex-fill.
Draw fillets to the edges of the dust flaps (radius 5 degrees).
Phase 6: Setting dimensions
Click the icon to watch the video. Run time: 1:25 min.
 , and then on the floating toolbar ensure that the on-relation button
  is not pressed in.