The following example shows how to create scripts, where to store them in your installation, and how to execute them. The example consists of three scripts, which:
NOTES
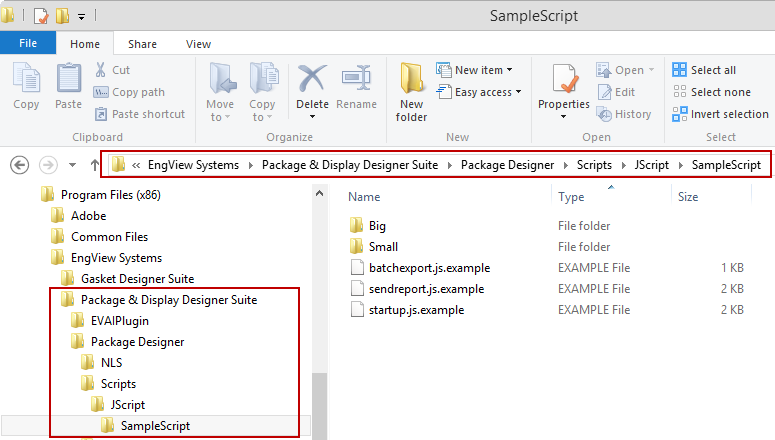
IMPORTANT: For Package & Display Designer to execute the scripts, they must refer to the hosting folders in the installation (pictured). That is why it is important that in the scripts you cite the locations of the scripts and the images for the script buttons. Learn how to refer to the script locations in the examples that follow.
//Init(), if it exists, is the function that is executed during the start of the CAD system. It sets up the required UI elements (buttons and toolbars).
function Init()
{
//In the UI, adds the Scripts tab. Also returns an instance of ITabItem.
var d = AutoAppUI.TabControlBar.AddCustomTab("Scripts");
//Adds a button to the just-added ITabItem. Also returns an instance of IAutoCustomButton.
//"JScript" is the language of the executed script.
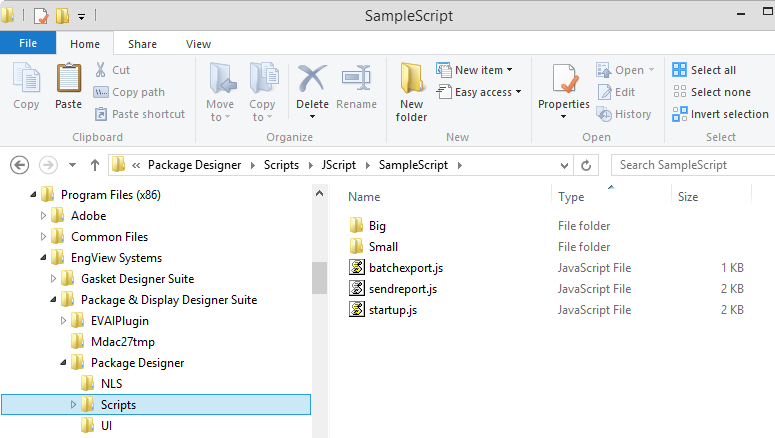
//"SampleScript" is the script's namespace. This parameter MUST match the folder name under ..\Scripts\JScript\.
// In the example, the script is located at .\Scripts\JScript\SampleScript\startup.js.
// and is based on this "namespace". The script engine will locate the implementation scripts matchexport.js and sendreport.js.
//"BatchExport" is the name of the function to execute.
//"./Big/Export.png" is the name of the button image.
//"Batch export" is the button tooltip.
//"Execute batch-export to multiple formats" is the text displayed in the bottom left corner when the mouse is over the button.
var c = d.AddMacrosButton("JScript", "SampleScript", "BatchExport", "./Big/Export.png", "Batch export", "Execute batch-export to multiple formats");
var c = d.AddMacrosButton("JScript",
"SampleScript", "SendPrintReport", "./Big/Report.png",
"Send form to mail", "Generate a print-report and send
it to an e-mail");
}
NOTE ON USED ICON IMAGES: The script's code contains references to the button icon images (see var c in the script code above). The icons are designed to fit into the used icon theme. Package Designer comes with two icon themes — Big and Small. If you want to change an icon theme, make sure you change the path that refers to the respective button icons.
function BatchExport() {
//The following script exports the current drawing to a specified path and in a specified file format.
AutoDrawing.ExportToFormat("c:\\EngViewWork7\\Test.pdf", "pdf");
AutoDrawing.ExportToFormat("c:\\EngViewWork7\\Test.dxf", "dxf");
AutoDrawing.ExportToFormat("c:\\EngViewWork7\\Test.cff", "cf2");
}
function SendPrintReport()
//Creates an instance of the IPrintDrawingBuilder interface.
//Used for creating and manipulating print drawings (design frames) in the system.
var builder = AutoProject.MakePrintDrawingBuilder();
//Loads the template used for creating the print drawing. It looks for it by name in the Settings folder, which stores the templates.
builder.LoadTemplate("A3 Landscape OneUp.evf");
//Looks for OneUp1 placeholder in the loaded template and setup its properties.
var placeholder1=builder.ItemByName("OneUp1");
//Turns on the measure-lines in the placeholder OneUp1.
placeholder1.ShowML=true;
//Builds the print drawing from the configured template.
builder.Apply();
//Exports the generated print drawing as PDF.
builder.PrintDrw.ExportToFormat("c:/EngViewWork7/DesignFrame.pdf", "pdf");
//This is how you get an instance of the COM interface provided by another application.
//The example uses Outlook because an email is sent at the end. NOTE: This is a generic approach.
var outlookApp = new ActiveXObject("Outlook.Application");
var theMailItem = outlookApp.CreateItem(0);
theMailItem.to = "baba@gmail.com";
theMailItem.Subject = "SUBJECT HERE";
theMailItem.Body = "BODY";
theMailItem.Attachments.add("c:/EngViewWork7/Test.cff");//the path to the file to attach.
theMailItem.display();
}
The Register dialog box appears.
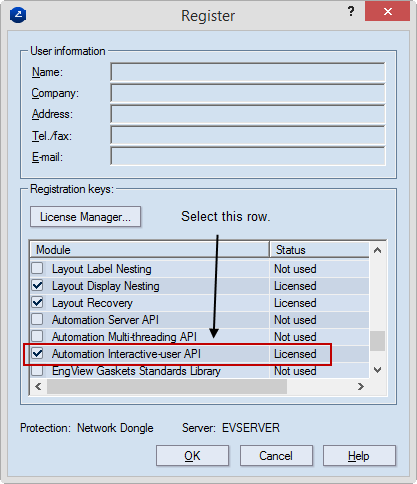
IMPORTANT: If the license you work with — network or local protection — does not feature these modules, write to support@engview.com to request them.
A message appears prompting you to restart the program before the scripts can be used.
After the program has restarted, the scripts files are loaded. The scripts' icons appear on a separate Scripts toolbar.
