Filling enclosed regions in the 1up
You can use hatch patterns to fill enclosed areas in the graphical area. You can use a single-line pattern, a cross-line pattern or a solid pattern of your own making.
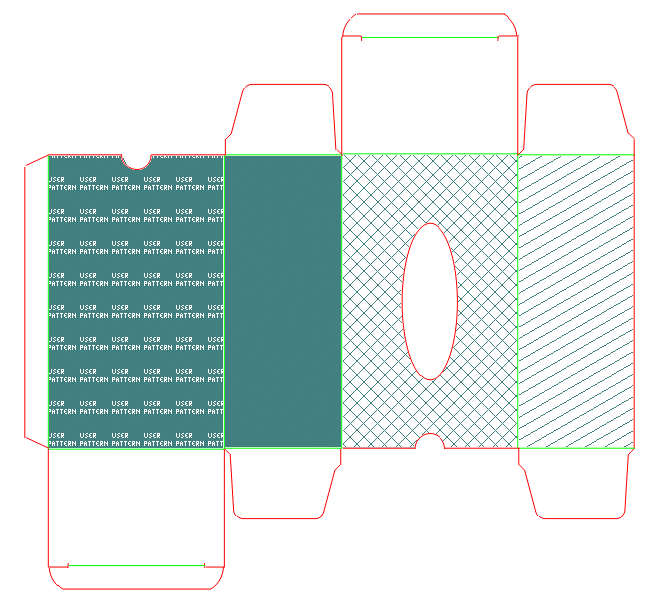
Filling enclosed regions of the 1up
Setting advanced fill pattern properties
Converting a single, cross fill to its constructional line segments
Notes
- A fill is visible only on the screen and in printing; fills are not processed in CAM samplemaking.
- Applying a fill over previously applied fill deletes the old one.
- Be careful when moving or modifying an enclosed object or a series of objects that enclose a filled area: if the control point of the fill is outside the enclosing region, the fill will not appear until you move the control point back into the enclosed area.
- You can reposition a fill by dragging it around in the graphical area. However, repositioning an existing fill by dragging its control point outside its enclosed area does not delete the fill, although you may not see it on the screen. To manage the existing fills, look in the Objects tab in the tabular area.
- A fill can be helpful if you want to check if an area is closed or if there are gaps in a contour. To perform such a check, first try to fill the closed area; if no fill is applied, then the area is not closed. In such a case, draw auxiliary lines to partition the area, and then fill the resultant smaller regions until you discover the one that cannot be filled — it is the unclosed one.
- During repositioning a fill, when in the contextual edit bar you enter a value in one of the edit boxes, Dx or Dy, and then move to the next edit box, the scope of the fill preview is limited according to the specified value. Consider the following example:
If during repositioning a fill you enter a value of 40 mm for relative Dx offset distance and then move to Dy, when you point to define the new location of the fill its control point will be limited to the imaginary vertical borderline stretching at 40 mm rightward from the original Ox coordinate value of the fill. To drag the fill preview freely again, in the respective edit box (Dx or Dy) enter 0.00, press TAB or ENTER to move to the next edit box.
The zero-value rule applies only for distance values.